I LOVE Halloween. Something about the crisp, cool fall air, added to a holiday that it's ok to be whomever you want to be just makes me smile. So while I was shopping at the Exchange the other day, I noticed the small assortment of Halloween decorations, and wasn't pleased. I knew it was time for me to get a little crafty and make some of my own.
I know you can buy that pack of spiderweb stuff at the store, that looks and feels like real spiderwebs, but I didn't want to use that this year. It has a tendency to stick to everything, and with a 4 year old running around that likes to get into EVERYTHING, I knew that would be torn down in a heartbeat. Of course, he too can ruin this decoration (a long with EVERYTHING else in my house....), but at least I can alter the height a bit and get him involved in the creating!
This project is very similar to the paper snowflakes made at Christmas time; it's really simple! And with a little bit of sparkle (with paint) and glitter, you can have some really awesome looking Halloween decorations!
What you need:
Paper - I used just plain old printer paper, but you can use any kind you like (note: the thicker the paper, the harder it will be to cut!)
Scissors - you'll need a sharp pair, the safety kind can be used, but it will be harder to cut
Pencil
Spray Paint
Glitter
String, monafilament, or fishing line
glue stick (optional)
spider rings (optional)
First I'll show you how to make a simple spiderweb.
 |
| Fold your paper in half, so the short sides meet. |
 |
| Then, fold your paper in half again, but ONLY crease about an inch of the bottom of the paper, with the fold on the bottom. This crease will be used only as a guideline. |
 |
| This is where it gets a bit tricky, and practice makes perfect. Fold one of the corners in about 3/4 of the way making sure the point is at the crease you made in the last step. Don't crease it to hard, yet, so you can adjust with the next step. |
 |
| Take the other corner, and fold it BEHIND the paper, so the sides all match up. After you adjusted both folds until they are matched, then crease each side. If your sides are not perfect, don't fret, it will still look cool - like I said it takes practice to get it exact. |
 |
| Now cut off the "ears" so you have a traditional triangle.... |
 |
| ...like this. Now fold the two sides together to make an even smaller triangle. |
 |
| Remember where you main fold is - you can't cut on that side, or your spiderweb won't come out right. My fold is on the left, since I'm left handed (I've annotated that in the pictures). With your pencil, draw a swooping curve across the top and then cut it out. Next, draw rectangles down the triangle, remembering to stop before the fold, to help guide you when you cut. Then cut out the lines you marked. At the bottom, you can cut off the tip, because this will be the middle of your web. |
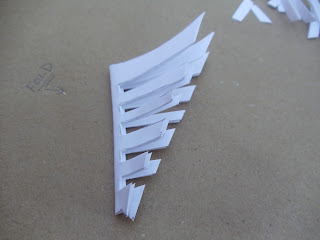 |
| This is what it will look like after you made all of your cuts! |
 |
| Unfold your web carefully and VIOLA! |
 |
You can of course stop at this point, and just glue your web onto some paper and adorn it with fun halloween decorations, like my son did.
If you think you've got the simple spiderweb mastered, and what to make a little more detailed one, then try these instructions.
Before doing this one, keep repeating to yourself, "spiderwebs are not symmetrical." Your spiderweb doesn't have to be perfect, because NOTHING in nature is perfectly exact! |
 |
| To start off this spiderweb, you will be making the normal printer paper into a square . So fold the paper into a triangle, then cut off the extra strip, and be sure to crease the triangle. Then fold the triangle in half, to make a smaller triangle, and hold the triangle so the widest point is facing down. Now fold the one corner about a 1/3 of the way, making the tip of the triangle meet up with the corner. Just like the simple one, take the other corner to the back and match up the sides, to make the triangle look like it has cat ears (PRACTICE, PRACTICE, PRACTICE). After the sides are all matched up, with creases, cut off the top ears, to make a full triangle. |
 |
With your pencil, draw a line down the center of your triangle - this line is important, because you can't CUT this line at all. Draw your lines with how you want to cut along it, making sure you STOP at the center line.
With this style, you can get a little more funky with your cutting, since this web will be a little more detailed . In the next pictures, I'll be showing you two examples of how I did it, so you can see what they will look like. |
 |
| Here are what the triangles look like after cut out.... |
 |
| ....and unfolded! With this cut, there are more veins. |
Now my favorite part.....the decorating!
 |
| Once you've created several webs, you're ready to decorate them. |
 |
| Spray one side with the spray paint, making sure it's all covered. |
 |
While the paint is still wet, sprinkle over glitter - on this one, I painted it black and sprinkled it with teal glitter.
Be sure to do this to both sides. |
 |
| I sprayed my webs with black, copper and silver. You can get a little funky and spray them with two colors, giving them a different look. |
 |
| After they were completely dried, I threaded some string (in this case, some clear string for jewelry making), in two webs, and tied it off. String as many as you like together; here I used 4 large webs on one, and 3 large with 2 mini webs on another to make a curtain in a doorway. |
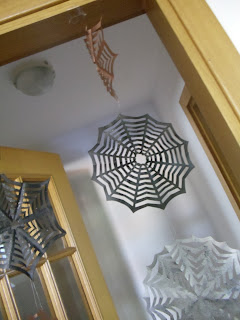 |
| Add a little personality by adding plastic spider rings to a web here and there. |
And now you have your very own beautiful, handmade spiderweb decoration! Post pictures of the ones you make on the
Homefront Team Facebook Page, and share it with everyone - I'd love to see yours!
This tutorial was shared with us by Guin from Camelot's Treasures. Be sure to check out her store, for some wonderful handmade items. And support all the great military spouses around the world on the Homefront Team, by searching "homefront team" on your next visit to Etsy!


2 comments:
Wow, those are so neat. I must remember to show this to my 10 year old. He loves origami and snowflakes and will be all over this!
This is so cute! We will have to make these!
Post a Comment